画像アップロードの4つの方法:画像リサイズを簡単にした方法
2025年6月11日公開 著者:Kestrel Toolsチーム • 7分で読める
プロジェクトの締切に追われている状況を想像してください。Instagramに投稿する画像をリサイズする必要がありますが、まずSlackから画像を保存し、ダウンロードフォルダから見つけて、画像リサイザーを開いて、参照ボタンをクリックして、再度ファイルを探して…疲れませんか?
私たちも同じ苛立ちを感じていました。だからこそ、画像リサイザーとのやり取り方法を完全に再設計しました。従来の「クリックして参照」方式の代わりに、4つの異なる方法でツールに画像を取り込めるよう構築しました。なぜなら、あなたのワークフローが作業方法を制限すべきではないからです。
デザイナーが複数のプロジェクトを同時に進行している場合でも、ソーシャルメディアマネージャーがコンテンツを最適化している場合でも、開発者がアセットを準備している場合でも、これらの新機能は画像リサイズに対する考え方を変革します。
従来のアップロード方法の問題
典型的な画像リサイズワークフローについて正直に言いましょう:
- 画像を保存する(メール、Slack、ウェブブラウザーから)
- どこに保存したか覚えている(通常はダウンロードフォルダだが、定かではない)
- 画像リサイザーを開く(ブラウザーで)
- 参照ボタンをクリックしてフォルダを探す
- 数十個の他のファイルの中から画像を見つける
- アップロードして処理を待つ
このプロセスは単に遅いだけでなく、精神的に疲れます。各ステップでコンテキストを切り替え、ファイルの場所を思い出し、人間ではなくコンピュータ用に設計されたインターフェースを操作する必要があります。
私たちは自問しました:「これをリサイズしたい」という思考と同じくらい簡単に画像をアップロードできるとしたらどうでしょうか?
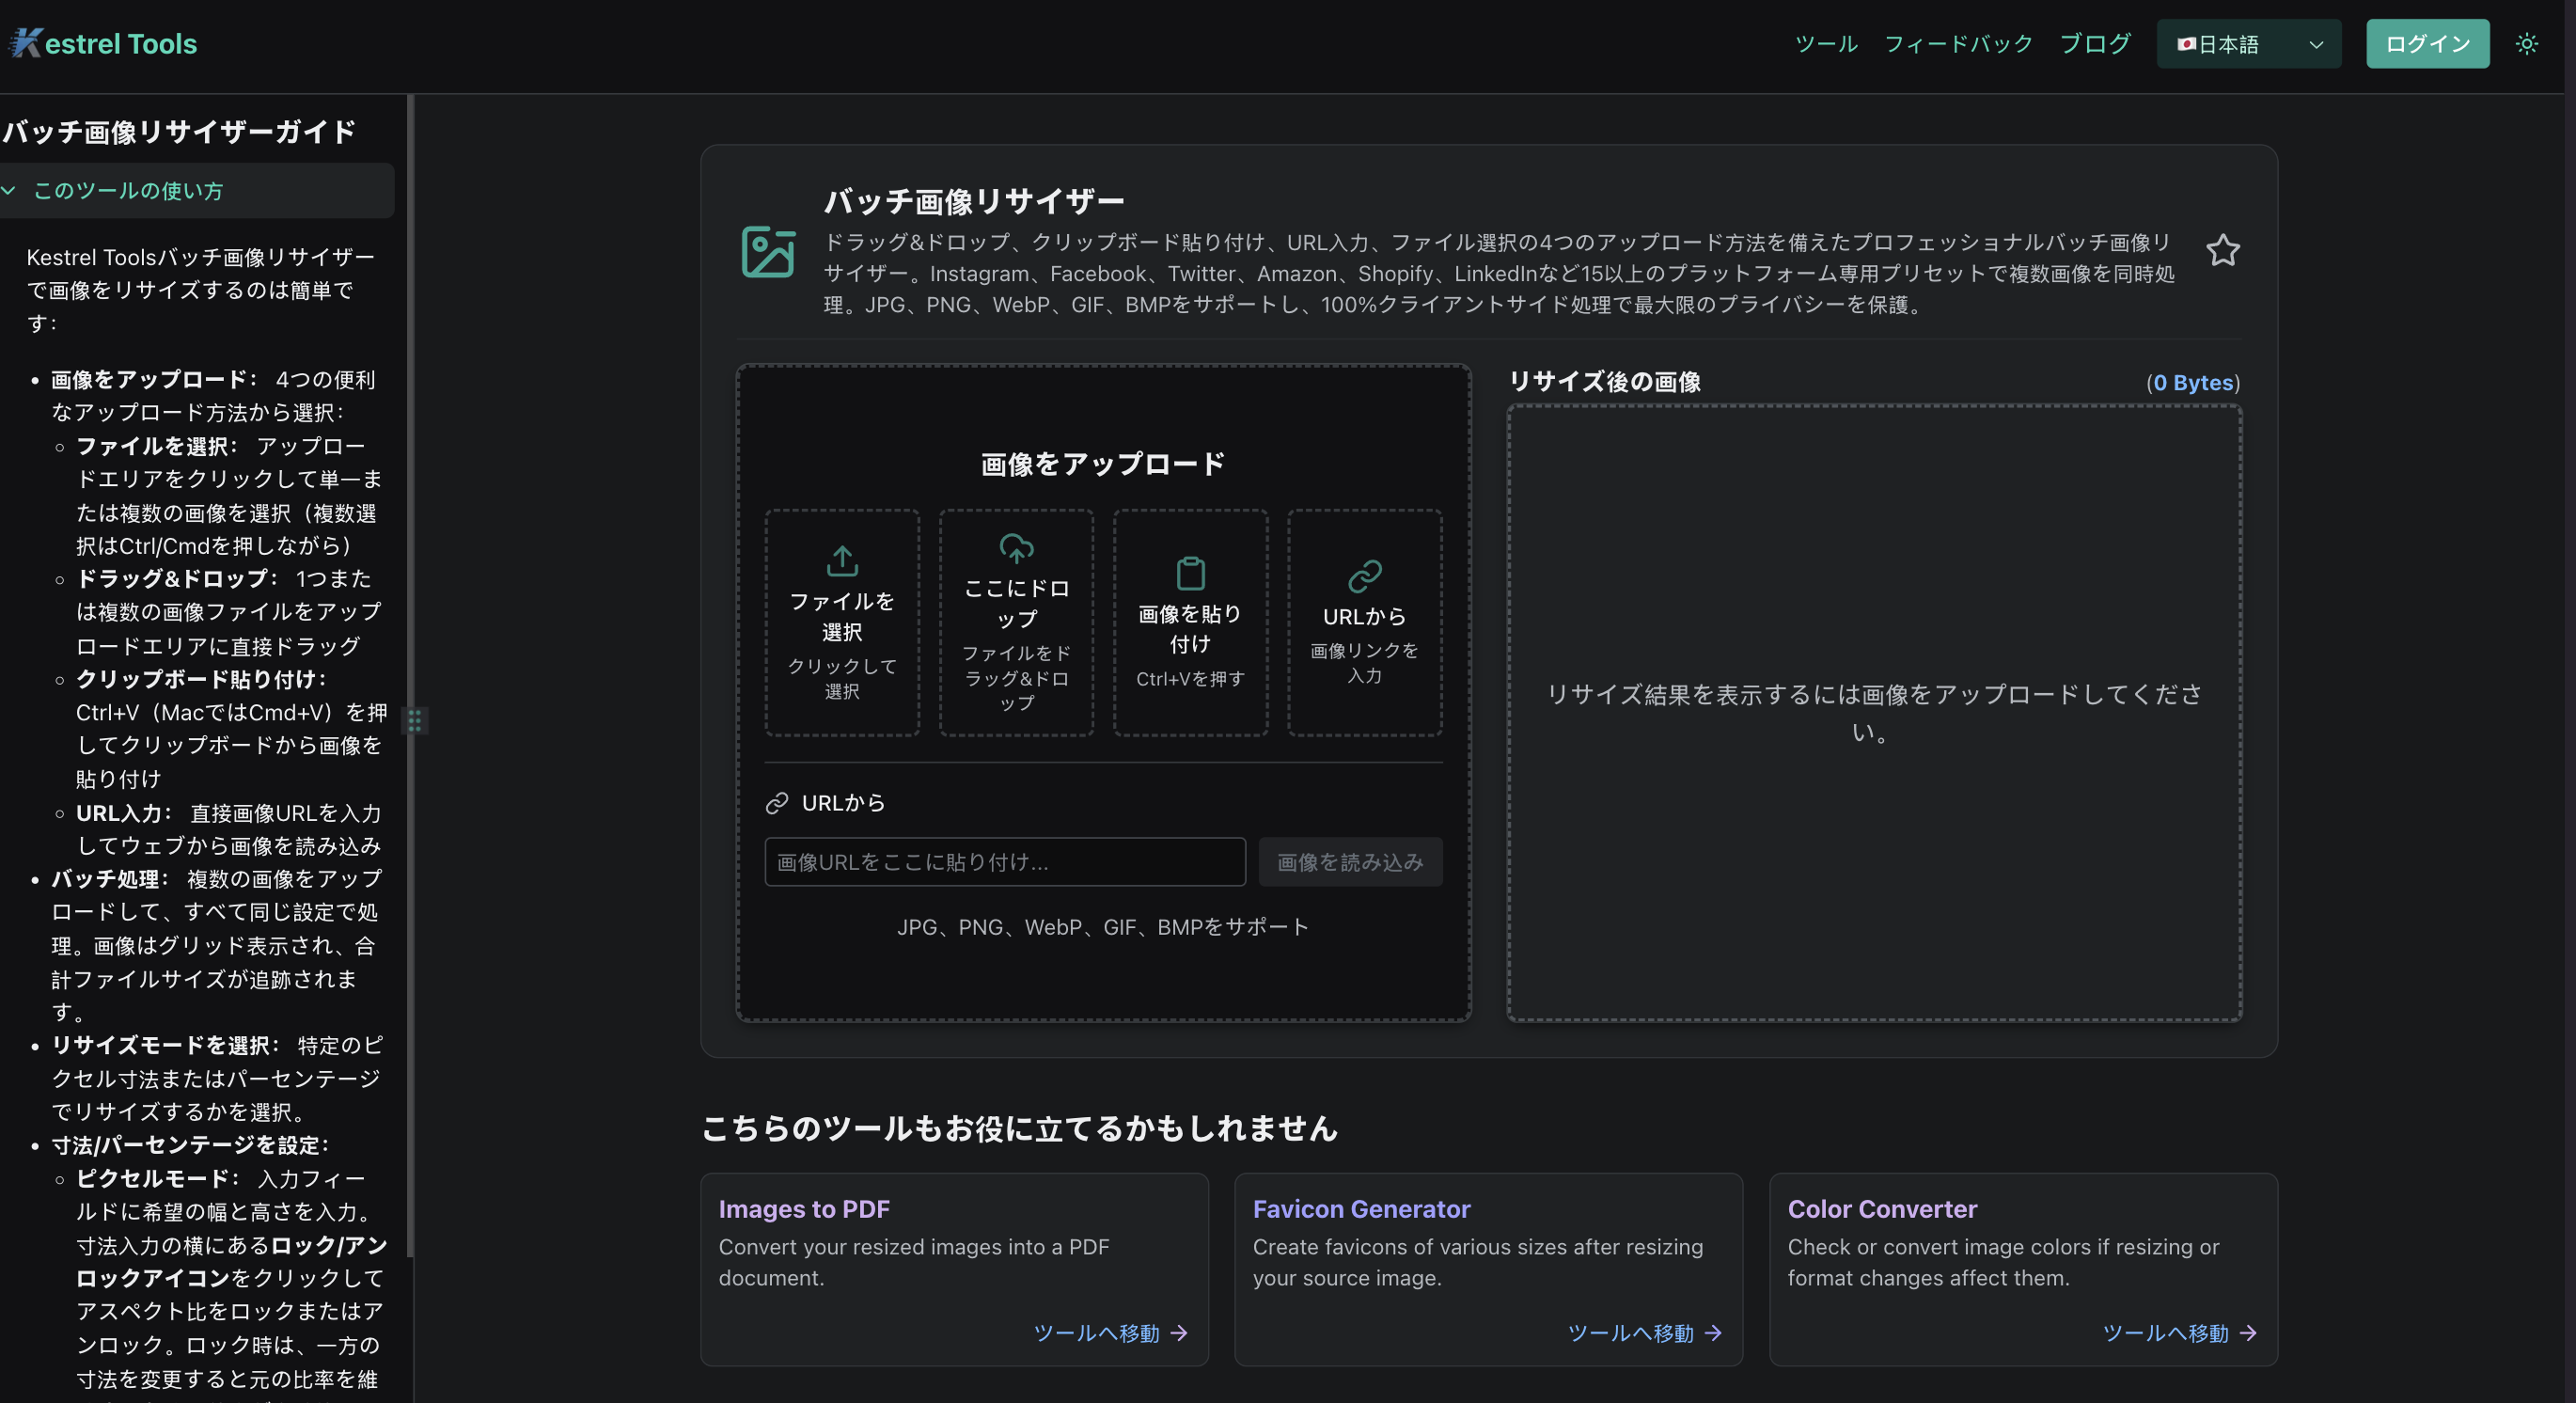
実際の作業方法に合わせた4つのアップロード方法
ほとんどの画像リサイザーは1つのワークフローに強制します:参照をクリック、フォルダを探し、アップロード、待機。私たちは4つの異なる方法を構築しました。なぜなら、実際の作業は一つの方法だけでは行われないからです。
スクリーンショットを撮影する場合:クリップボード貼り付け
従来の方法: スクリーンショット撮影 → デスクトップに保存 → リサイザーを開く → ファイルの参照 → アップロード → 一時ファイルを削除
新しい方法: スクリーンショット撮影 → 直接貼り付け(Ctrl+V) → リサイズ → 完了
なぜ重要か: バグの文書化、チュートリアルの作成、アプリインターフェースの共有を行う場合、おそらく数十枚のスクリーンショットを撮影するでしょう。他のツールでは、まずそれぞれをファイルとして保存する必要があります。私たちはその手順を完全に省略しました。
他のツールが見落としていること: ほとんどの画像リサイザーはクリップボード貼り付けを全くサポートしていません。サポートしている少数のツールでも、異なる画像形式で失敗したり、入力中に干渉したりします。私たちのスマート検出は、入力フィールドにいない時のみ貼り付けをアクティブにします。
オンラインで画像を見つけた場合:URL入力
従来の方法: 画像を右クリック → 名前を付けて保存 → ダウンロードに移動 → リサイザーを開く → ファイルの参照 → アップロード → ファイルを削除
新しい方法: 画像を右クリック → 画像アドレスをコピー → URLを貼り付け → リサイズ → ダウンロード
なぜ重要か: コンテンツクリエイターやマーケティング担当者は、ストックフォトサイト、ソーシャルメディア、ウェブリサーチから常に画像を取得しています。従来のダウンロード優先方式では、一時ファイルでコンピューターが散らかります。
他のツールが見落としていること: ほとんどのリサイザーはURLから直接画像を読み込むことができません。一度だけ使用する画像でも、すべてをローカルにダウンロードすることを強制されます。
ファイルが見える場合:ドラッグ&ドロップ
従来の方法: リサイザーを開く → 参照をクリック → フォルダツリーを移動 → ファイルを見つける → 選択 → アップロード
新しい方法: フォルダからファイルをドラッグ → リサイザーにドロップ → 即座に処理
なぜ重要か: 写真を整理している時や特定のフォルダのファイルを扱っている時、リサイズしたいものが正確に見えています。ドラッグは自然で、複数のクリックを節約できます。
他のツールが見落としていること: 多くのツールには小さなドロップゾーンや視覚的フィードバックが不十分です。正しい場所にドロップしているのか、うまく動作したのかが分からないことがあります。
場所が分かっている場合:強化されたファイル参照
従来の方法: 小さな「参照」ボタン → 小さなファイルダイアログ → フォルダを探す
新しい方法: 大きなクリック可能エリア → より良いファイルフィルタリング → 即座にプレビュー
なぜ重要か: 時には従来のファイルブラウザが必要な場合があります、特に整理されたフォルダ内の画像の場合。私たちはアップロードエリア全体をクリック可能にし、画像ファイルのみを表示するようにフィルタリングしました。
他のツールが見落としていること: ほとんどのツールには小さな参照ボタンがあり、特にモバイルでクリックしにくいです。ファイルダイアログはすべてのファイルタイプを表示するため、画像を見つけるのが困難です。
プラットフォームプリセットが正気を保つ理由
従来の方法: 「Instagram画像サイズ」をGoogle検索 → 矛盾する情報を見つける → 1080x1080か1200x1200か思い出そうとする → 推測して上手くいくことを祈る
新しい方法: 「Instagram投稿」をクリック → 完璧な寸法が自動的に設定される → 完了
画像サイズの本当の問題
すべてのプラットフォームには異なる要件があり、それらは常に変化しています。Instagramは正方形の投稿を望みますが、縦型のストーリーです。LinkedInは横型を好みます。Amazonは巨大な商品写真を要求し、Shopifyは小さなファイルの方が効果的です。
ほとんどの人は次のいずれかです:
- 間違ったサイズを使用して、なぜコンテンツが悪く見えるのか疑問に思う
- 各投稿の寸法をGoogle検索に時間を費やす
- もはや正確でない古いサイズガイドをブックマークしている
実際に機能する15以上のプリセット
私たちは現在のプラットフォーム要件を調査し、それらを直接ツールに組み込みました:
ソーシャルメディア: Instagram(投稿とストーリー)、Facebook(投稿とカバー)、Twitter(投稿とヘッダー)、LinkedIn(投稿とバナー)
Eコマース: Amazon(ズーム用2000×2000px)、Shopify(速度用800×800px)、Etsy(マーケットプレイス標準)
ウェブ&モバイル: フルHDバナー、モバイル壁紙
私たちのプリセットの違い: 単なる寸法リストではありません。任意のプリセットをクリックすると、ツールは自動的に正確なピクセルモードに切り替わり、アスペクト比のロックを無効にし、完璧な寸法を設定します。手動入力も推測も不要です。
隠れた利点: プリセットはプラットフォームアイコンでカテゴリ別に整理されているため、必要なものが一目で分かります。レイアウトはモバイルの2列からデスクトップの5列まで適応し、常にアクセス可能です。
これらの機能が実際のシナリオでどう動作するか
ソーシャルメディアマネージャー:マルチプラットフォームコンテンツ
以前: 画像保存 → リサイザーを開く → 参照 → アップロード → Instagram用にリサイズ → ダウンロード → Facebook用に繰り返し → Twitter用に繰り返し → 15分以上
現在: 画像をドラッグ → Instagramプリセットをクリック → ダウンロード → Facebookプリセットをクリック → ダウンロード → Twitterプリセットをクリック → ダウンロード → 合計2分
開発者:スクリーンショット文書化
以前: スクリーンショット → デスクトップに保存 → リサイザーを開く → ファイル参照 → アップロード → リサイズ → ダウンロード → 一時ファイル削除 → 8ステップ
現在: スクリーンショット → 貼り付け(Ctrl+V) → リサイズ → ダウンロード → 4ステップ、一時ファイルなし
コンテンツクリエイター:ウェブ画像
以前: オンラインで画像を見つける → 右クリック保存 → ダウンロードに移動 → リサイザーを開く → 参照 → アップロード → リサイズ → 元画像削除 → 8ステップ
現在: 画像を見つける → URLをコピー → URLを貼り付け → リサイズ → ダウンロード → 5ステップ、ローカルファイルなし
Eコマース:商品写真
以前: 写真家からダウンロード → リサイザーを開く → アップロード → Amazon用にリサイズ → ダウンロード → 再度アップロード → Shopify用にリサイズ → ダウンロード → 8ステップ
現在: 写真家からURLをコピー → 貼り付け → Amazonプリセット → ダウンロード → Shopifyプリセット → ダウンロード → 6ステップ
シームレスなアップロードを支える技術的魔法
技術的な詳細を理解する必要はありませんが、この体験を可能にしているものは以下の通りです:
クライアントサイド処理は、画像がブラウザーから離れることがないことを意味します。ドラッグ、貼り付け、参照、URLから読み込み、どの方法でも、すべてがデバイス上で処理され、最大限のプライバシーと速度を実現します。
スマートファイル処理は、画像形式を自動的に検出し、各アップロード方法に対して処理を最適化します。
プログレッシブエンハンスメントは、JavaScriptが無効または読み込みが遅い場合でも、ツールが完璧に動作することを保証します。
メモリ最適化は、ブラウザーをフリーズさせることなく、大きな画像を効率的に処理します。
アップロード方法が思っているより重要な理由
画像をアップロードする方法は些細な詳細に思えるかもしれませんが、生産性に根本的に影響します:
認知負荷: 追加のステップごとに精神的エネルギーが必要で、フローを妨げる コンテキスト切り替え: アプリケーションとフォルダー間の移動が集中を妨げる 時間の蓄積: 小さな非効率性が積み重なって大きな時間のロスになる イライラ要因: 扱いにくいワークフローがストレスを生み、仕事の満足度を下げる
複数のアップロード方法をサポートすることで、私たちは単に機能を追加しているのではなく、あなたのクリエイティブプロセスから摩擦を取り除いているのです。
次の段階:さらなるアップロード革新
私たちはここで止まりません。私たちのロードマップには以下が含まれます:
バッチアップロードサポート: 複数の画像を一度にアップロードし、すべてに同じ設定を適用 クラウドストレージ統合: Google Drive、Dropbox、その他のクラウドサービスへの直接アクセス ブラウザー拡張機能: ウェブ上の任意の画像を右クリックして即座にリサイズ モバイルアプリ: カメラ統合を含むネイティブモバイル体験
今日違いを体験してください
これらの機能があなたのワークフローをどのように変革するかを理解する最良の方法は、実際に試してみることです。
ドラッグ&ドロップをテスト: 画像リサイザーを訪問し、任意の画像ファイルをアップロードエリアにドラッグしてください。
クリップボード貼り付けを試す: スクリーンショットを撮影し、リサイザーページでCtrl+V(またはCmd+V)を押してください。
プラットフォームプリセットを使用: 任意の画像をアップロードし、Instagram投稿プリセットをクリックして即座の最適化を確認してください。
URLから読み込み: オンラインで任意の画像を見つけ、そのURLをコピーして、私たちのURL入力フィールドに貼り付けてください。
各方法がいかに自然で即座に感じられるかに注目してください。フォルダーを探す必要も、一時ファイルも、コンテキスト切り替えもありません。ただ必要な画像を、必要な方法でリサイズするだけです。
画像ワークフローを合理化する準備はできましたか?強化された画像リサイザーを試して、適切なアップロード方法があなたの生産性をどのように変革できるかを発見してください。
新機能についてのユーザーの声
「クリップボード貼り付け機能は私の文書化ワークフローの画期的な変化です。スクリーンショット、貼り付け、リサイズ、完了 - 一時ファイルでデスクトップが散らかることがありません。」 – Alex R.、技術ライター
「プラットフォームプリセットが大好きです!異なるソーシャルメディアプラットフォームの画像サイズをGoogle検索する必要がありません。Instagramをクリックするだけで毎回完璧です。」 – Maria S.、ソーシャルメディアマネージャー
「URLを直接貼り付けできることで、ブログコンテンツ作成時に非常に時間が節約されます。オンラインで素晴らしい画像を見つけましたか?最初にダウンロードすることなく即座にリサイズできます。」 – David L.、コンテンツクリエイター